Monday, November 23, 2009

Regions Riverchase Complex

Photo 1: Exterior of the Regions Operation Center (aka the ROC) for Regions Bank in Birmingham, Alabama.

Photo 2: The main lobby for the ROC.

Photo 3: The view from the bridge cafe nestled between the north and south buildings.

Photo 4: According to a woman walking by, this is, "The ugliest Christmas tree." Apparently they get worse each year. I don't think it's too bad, personally.

[crf]

Sent from my Verizon Wireless BlackBerry

Tuesday, November 17, 2009

Kitchen Face Lift


Project number 3 has been a kitchen update. There's been some serious labor poured into this project. For the record, the genius who invented the idea of wallpaper is fortunate that we didn't live in the same time period. That's all I'm going to say.

The process:
1. The remaining wallpaper had to be stripped. I started out using a steamer but didn't get satisfactory results. I saw on HGTV that you can spray a vinegar/water solution onto the wallpaper and let it soak for a couple of minutes for easy removal. While it did remove the wallpaper much easier, I should not that you can receive optimal results by lightly scoring the wallpaper. Be careful not to apply too much pressure; you WILL damage the drywall.

2. Using steam to remove the wallpaper inadvertantly removed some sections of the drywall as well, a problem which needed to be resolved before painting could begin. I used a spackle that goes on pink and dries white. This is a double win. First, you can easily see if you've patched an area already when you're dealing with exposed drywall--which is also obviously white--and second, it gives you an easy indication when the surface is ready for a second application.

3. This was easily the messiest part of the project. Once the spackle had dried completely, the sanding process began. Purchase plastic drop cloths to cover all case openings into the space--they're not expensive at all and they'll keep dust from traveling to other areas in the space. Also make sure that you wear both eye protection and a dust mask. Also, make sure that you wear both eye protection and a dust mask. Yes, I said it twice. The point needs to be driven. I started by just sanding the spackles areas, but then I realized that the sanding brick also would remove some of the leftover glue residue from the wallpaper. So alas, I sanded the walls from ceiling to floor. Needless to say, I looked OLD from all of the dust.

4. Once the sanding was finished, I used a wet rag to remove the excess dust from the walls and trimwork and swept up the dust that had fallen onto the floor. Wiping the walls gives the paint a surface to actually adhere to--which is why you sanded in the first place!

5. With the walls prepped, then came the pre-painting tape-off. I'm obsessive compulsive when it comes to preventing a mess and keeping things crisp, so I take my time applying painter's tape. Always keep in mind the scope of your project, however. Had I remembered that I'm also going to paint the trim and doors of the kitchen, I would've realized that it was ok to get paint on the trim. The cabinets and counters, however, did need to be outlined.

6. The first coat went down. I used a bristled brush to apply the outline. To prevent brush lines from appearing, you can "feather out" the paint. This just means using the brush to go beyond the stroke marks and blend the paint seamlessly into the wall. Brush strokes are your enemy. I then used a brush roller to fill in the rest. I roll vertically, starting in the middle of the wall and working down then up, but I've also heard that you're supposed to apply diagonally to prevent stroke lines. I didn't notice any line marks, but it's worth noting.

7. The first coat dried and I dropped down the second coat the same way. Trim, feather, roll.

Make sure you give everything time to dry properly. Don't rush yourself or the project, or you'll get rushed results. Also of note, when your walls are damaged like these were, consider using a coat or two of Kilz before applying the paint. The paint I purchased was the primer+paint from Behr, but after two thick coats, the results were--thusfar--satisfactory. The photo was taken while the first coat was drying. It's raining today, so when I return tomorrow to start the trim work, I'll take another photo. The trim will be a crisp white interior latex enamel, also from Behr. Expect photos soon!

I think that's pretty much everything that I was going to say about that. If anything else pops into mind, I'll post. As always, comment, critique, question, b&g.

[crf]

Monday, November 16, 2009

The IKEA clock lives!

Sent from my Verizon Wireless BlackBerry

Just kidding!

I love going through the media card on my BlackBerry. I found a better shot of my living room--and not from the perspective of a cockroach!

As always, enjoy and critique.

[crf]

Sent from my Verizon Wireless BlackBerry

My old apartment

This is my first attempt at a multi-photo post from la BlackBerry. Work with me here, people.

I present to you the living room from my most recent apartment. I was resting on the floor one day and felt artsy, so ... Voila!

I'm a bit of a minimalist, so even this is a bit much for me. Each move, however, brings me closer and closer to my modernist/minimalist aesthetic that I so long to attain. The next apartment/condo will take it to yet another level--and maybe I'll even be able to paint the walls!

A note for media fanatics: backlighting your flat panel TV while dimming or turning off all other lights in the room not only creates a spectacular visual focus on your television, but it also helps reduce the strain on your eyes that an otherwise pitch-black room would trigger--even though it makes the entire experience more "theatrical." Oh, and don't judge me for watching Smallville. Tom Welling is a fox, and you know it.

Thoughts from your friendly neighborhood designer. Input and criticism are always welcome and encouraged. Take care b&g.

[crf]

Sent from my Verizon Wireless BlackBerry

Sunday, November 8, 2009

Finished and assembled; currently cooling for first use.

Sent from my Verizon Wireless BlackBerry

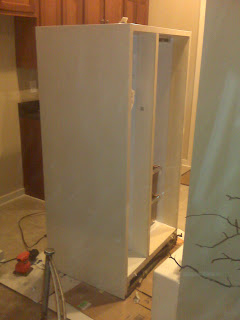
Refrigerator Reno

So my friend just bought a house, and one of the appliances that he's been lacking was the refrigerator. His mother had one for him, which he drove to Tennessee to pick up today. All of his other appliances are black; this fridge is almond. So what's a designer to do?

That's right. Break out the paint cans, painter's tape, and brushes!

This was my first time both working with an appliance and working with oil-based paint. I'll walk you through it.

- Used a sand block--fine grain--to sand down the existing surfaces to both get rid of scuff marks and debris and to give the paint a surface to adhere to
- Used a sponge-based roller brush designed for cabinets and doors to apply the paint; it worked much better than I thought it would
- Used one of my artist brushes to apply the paint to the smaller cracks, crevices, nooks, and crannies

I'm not sure if it's a quality of oil-based paints or if the brush was just awesome, but the paint really seemed to self-level itself out, making brush strokes impossible to detect. It'll definitely take two coats because of the texture of the refrigerator, but after just one, it looks a thousand times better; you'd never know just how ancient it really is unless you Googled the model number (which I MAY have accidentally painted over; oops!).

Once the entire unit is reassembled, I'll take a final photo. I just hope the thing actually works! We'll see soon enough.

[crf]

First coat drying; you're welcome

Sent from my Verizon Wireless BlackBerry

Saturday, November 7, 2009

First coat, door 1

Sent from my Verizon Wireless BlackBerry

Door 1 sanded and prepped for tape/paint

Sent from my Verizon Wireless BlackBerry

Coat no. 1 on the test side

Sent from my Verizon Wireless BlackBerry

Refrigerator Renovation


Sent from my Verizon Wireless BlackBerry

And this is the Hancock Building ...


Haha. I know, it's the Sears Tower. The poor tour guide ...

As we approached from this angle, she turned and said, "And now we're approaching the infamous Hancock Tower." Everyone on the boat was just like, "Uh, excuse me?" Good times.

Chicago, 2008. Neocon.

[crf]

Bourbon Street, Baby!


From my trip to Interiors 08 in New Orleans, March 2008. This sadly was the last year that Interiors was hosted on its own. It's now held in conjunction with Neocon during the summer. Such a shame, too.

Interiors--hosted annually by the American Society of Interior Designers--was a great way to meet interior designers not only from across the nation but sometimes from across the world. It was an amazing networking opportunity that I very much miss.

More to come as I sift through my photo folders. Stay tuned, b&g.

[crf]

Mainstreet Crestwood


I'm in a sharing mode.

This is the first--and subsequently last--model that I did during my senior year in college. The class was commercial design. We were each given a space in a shopping center and were responsible not only for designing said space but also finding a way to mesh all the designs together in one cohesive shopping center proposal.

Yeah, I know, there's totally not enough parking, but unless I had "bought" the lots of the surrounding residential areas and public parks, well, that's what they have to deal with. Good thing it was never built!

[crf]

San Francisco


One of my favorite images from my trip to San Francisco in 2007. I only wish the resolution was better so that I could print it larger than an 8x10.

[crf]

IMG00100.jpg

Attempting my first blog post from the Berry. This is the approach to Atlanta eastbound on I20. Enjoy, b&g.

[crf]

Sent from my Verizon Wireless BlackBerry